FAQ

Garage Doors & Gates

In most cases we can. The door would need to be in good operating condition and have enough room to allow for fitting the opener. Our installer can quickly assess the suitability on site.

The service interval we suggest for optimum functioning and longevity is once a year. This will prolong the life span of your door or gate and ensure the warranty conditions are complied with. Simply contact our office with any questions or to booking your service.

NO, you do not need to do anything at all as our professional technicians have already done all the safety checks for you; however, it is wise to contact our office if you notice anything unusual with the operation of your unit.

The 3 most common types of doors are as follows:

Roller door :
A ribbed steel curtain that moves vertically and rolls up around a drum. It is guided by tracks on the side of the door and is spring counter balanced. Suitable where there is good head room.

Sectional door :
Consists of a number of panels that are hinged together. The panels move vertically then horizontally beneath the ceiling. Tracks guide their movement and are spring counter balanced. Suitable for more modern homes as it can be clad with Colorbond steel or aluminium etc.

Tilt door :
A single piece panel with pivoting arms on either side of the opening. The panel moves out and up from a vertical position to a horizontal position. Suitable for openings with relatively low head room.

  • Sliding Gates :
    One or two sections of gate, mounted on tracks on the ground. The section/s open and close by sliding back and forth across the opening. Suitable for small to normal sized drive ways.
  • Swinging Gates :
    One or two sections of gate which open through a 90 degree angle. Suitable for relatively wide driveways.

Absolutely. Our transmitters are not pre coded so new remote transmitters will need to be coded to your existing motor.

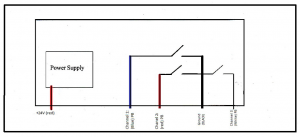
Roller doors require less supports than panel lift/sectional garage doors. Please download the noggin diagram via the link below. For any additional inquiries, send us an email with a photo attached from the inside of the garage, where the garage door is going to be installed.

Program a handheld transmitter or wireless wall mount remote

  1. Press the LEARN button once on the motor.

NOTE:  If the opener model is RDO-2 the learn button will be located underneath the cover.

  1. Repeatedly press the button of your choice on the handheld remote or wireless wall mount.

NOTE: LED light should be flashing meaning that the remote is now connected to the motor.

  1. Wait a few moments and press the chosen button on the remote. The door will automatically operate if the remote is connected.
  1. Press the CODE button once on the motor.

NOTE: The motor will display SL.

  1. Repeatedly press the button of your choice on the handheld remote or wireless wall mount.
  2. Wait a few moments and press the chosen button on the remote. The Door will automatically operate if the remote is connected.

Hold down the LEARN button for approximately 10-20 seconds until the LED button stops flashing.

Hold down the CODE button for approximately 10-20 seconds until the display shows DL.

    1. Remove the sliding gate motor cover.
    2. Press the LEARN button once on the motor (SW1).

    NOTE: The LED2 light should flash once and then turn off.

    1. Repeatedly press the button of your choice on the handheld remote.

    NOTE: The LED2 light will turn on about for approximately two seconds and then turn off again. This means that the transmitter is now connected to the opener.

    1. Wait a few moments and press the chosen button on the remote. The Door will automatically operate if the remote is connected.

Program a frequency receiver

    1. Press the LEARN button for approximately two seconds.

    NOTE: The LED light will then flash.

    1. Repeatedly press the button of your choice on the handheld transmitter until the LED light flashes and stops.
    2. Wait a few moments and press the chosen button on the remote. The Door will automatically operate if the remote is connected.
  1. Hold the LEARN button for approximately 10 seconds. The LED light will begin to flash and stop. This means that all codes are deleted.

Program a Wireless Keypad

    1. Press the “0” key and hold it down while pressing and releasing◀
    2. Release the “0” key.
    3. Type in the current or original factory setting (channel 1 “11” ◀)combination and press ◀
    4. Type in the new combination (up to 8 digits) and press ◀
    5. Type in the new combination again and press ◀
  1. Press the “0” key and hold it down while pressing and releasing ▶
  2. Release the “0” key.
  3. Type in the current or original factory setting (channel 2 “22” ▶) combination and press ▶
  4. Type in the new combination (up to 8 digits) and press ▶
  5. Type in the new combination again and press ▶
1 short beepKeypad Tone
1 long beepAuto Power off
3 long beepsModification of combination confirmed
5 short beepsError during combination import or Combination edit operation
10 rapid beepsBattery low warning signal, new batteries are required

Program a Bluetooth Receiver

  1. Download the BLE Door 1 application from the ITunes store.
  2. Turn on Bluetooth.
  3. Once installed, open the application.
  4. Click the learn button on the application. It will then state “searching”.
  5. Press the learn button on the Bluetooth Receiver. The red LED light should then turn on.
  6. The red LED light on the Bluetooth receiver should then flash and go out. (If the LED light goes directly out, this means that the learning failed and from steps 4. Onwards will need to be completed).
  7. The three buttons on the Application should then turn blue.
  1. Download the BLE Door 1 application from the Google Play store.
  2. Turn on Bluetooth.
  3. Once installed, open the application.
  4. Click the search button on the application. It will then state “searching”.
  5. Press the learn button on the Bluetooth Receiver. The red LED light should then turn on.
  6. The red LED light on the Bluetooth receiver should then flash and go out. (If the LED light goes directly out, this means that the learning failed and from steps 4. Onwards will need to be completed).
  7. The three buttons on the Application should then turn blue.
  1. Press and hold the LEARN button, the LED will show a red and green light flashing slowly followed by quick flashing movements.
  2. Once both the red and green lights go out release the button.
  3. The reset operation is now completed. Use the phone to double check that this process has been completed.
  1. Press and hold the delete icon on the application for approximately 6 seconds.
  2. When the dialog box appears click the OK icon.
  3. The 3 pictures will then change from a blue to a grey colour meaning that the deletion has been successful.
    1. Press and hold the delete icon (middle of the three icons) on the application for approximately 6 seconds.
    2. When the dialog box appears click the OK icon.
    3. The 3 pictures will then change from a blue to a grey colour meaning that the deletion has been successful.
TOP